Testing Automation Scripts with the new Maximo 7.6 “Testscript” method (Part 1: MBO based scripts)

Maximo introduced with Version 7.6 a new feature which allows you to test your automation scripts in context of a new or an existing Mbo as well as in context of the Maximo Integration Framework (MIF). The downside of that new function is, that I currently have not found any good documentation and that some features like the object path syntax are not self explaining. In this two part series I would like to introduce the new “Testscript” feature and explain how easy it is to use for your daily script testing. In part 1 we will cover the test of scripts in context of a Mbo and in part two I will show you how to test in context of the MIF.

The old styled “Run Script” testing is no longer visible but can be enabled again using the trick in my other post.

The first thing to mention if you want to test a script with the new Mbo-Test functionality is, that you need to have a script with an Object Launchpoint. Scripts with attribute launchpoints are not tested, or even worse if you have both: an object launch point and a attribute launch point on the same Mbo always the object script runs, even you select the attribute launch point script! (Might be confusing!). On the the other hand side you could utilize an Object Launchpoint testscript to set a certain attribute in a Mbo which then triggers the attribute launchpoint as well 😉

Now lets create a very simple script with an object launch point for the ASSET object like the following:

print "Hello World"
print mbo.getString("ASSETNUM")

Press the “Test Script” button and you will see the following dialog:

At the top you will see information about the script and the selected Launchpoint we are running on.

With 1. you will select if we want the script to be tested against a newly created object or and existing object.

In 2. an object path can be specified if we want to reference an existing object. The format I currently found out is:

<OBJECT>[<SQL-WHERE>]

Examples could be:

ASSET[ASSETNUM='11200']
ASSET[ASSETNUM like '11%']
ASSET[ISRUNNING = 1]
ITEM[ITEMNUM='0815']

Important to remember, that you always get only a single resulting record to your script. This is the default behavior for an object script, where the resulting set is stored in the implicit Launchpoint variable mbo.

If you select Existing Object and specify an Object Path (remember to copy the Object Path to the clipboard – you have to reenter it for every test!) you can press the Test button.

You might see a result as follows:

  1. Data contains the resulting MBO in XML format.
  2. Log contains the output of the Print statements of the script.

With the Set attribute values section you can specify attributes which are overwritten from the original result. This is a nice feature when you need some testing data with certain specification (e.G. We need an asset in status of not running (ISRUNNING = 0), so we just need to specify:

So far we just have discussed the Existing Object path. If you like to create a New Object this also can be done with the testing function. The testing function basically calls an mboSet.addAtEnd() function to append a new record to the given MboSet. With the usage of Set attribute values you can predefine fields of the newly created Mbo before it is handed over to the Jython script.

A bit strange is, that if you try to create an Asset Object and do not specify an ASSETNUM you will get an error, that the asset field needs to be specified. If you will set the ASSETNUM field you will get an error, that it is readonly and cannot be set.

The only solution I found so far is to hardly overwrite the readonly check by using the Field Flag “NOACCESSCHECK”:

from psdi.mbo import MboConstants
mbo.setValue("ASSETNUM", "ASS0815", MboConstants.NOACCESSCHECK )
mbo.setValue("DESCRIPTION", "New Test Asset!")

So far for this first tutorial on the new Test script capability. In the next part I will cover the capability to test automation scripts customizing the MIF Interface.

Jython Script Templates

In this post I would like to provide you simple script templates which can be used for your next project and which are compatible to the Eclipse to Maximo/ICD Upload Script described in this blog.

The following Template is for general usage in a Launchpoint script:

#-------------------------------------------------------------
# AUTOSCRIPT:         SIMPLETEMPLATE
# DESCRIPTION:        Sample template for usage in Launchpoints   
# AUTHOR:             Matthias Stroske
# Created             01.10.15
# LOGLEVEL:           ERROR
# VERSION:            3.0
# COPYRIGHT:          (c) Matthias Stroske
# MAXIMO/ICD Version: 7.6
#-------------------------------------------------------------
# History of Changes
#
# Ver  Date      Name               Description
# 1.0  01.10.15  Matthias Stroske   Initial Version
#
#-------------------------------------------------------------

mbo  # @UndefinedVariable

If you are using a CVS System to check in your scripts you can use the following template. A couple of sections like $Author: $, $Revision: $ and so on are automatically filled in when you check in your code. Specially the $Revision: $ tag is very nasty in combination with the Maximo Script upload, because it automatically sets the Verion of the Script in Maximo to the CVS Revision. Here the full template:

#-------------------------------------------------------------
# AUTOSCRIPT:         SIMPLETEMPLATE
# DESCRIPTION:        Sample template for usage in Launchpoints with CVS Integration
# LOGLEVEL:           ERROR
# COPYRIGHT:          (c) Matthias Stroske
# MAXIMO/ICD Version: 7.6
#-------------------------------------------------------------
# $Author: $
# $Revision: $
# $Date: $
#-------------------------------------------------------------
# History of Changes
#
# $Log: $
#
#-------------------------------------------------------------

mbo  # @UndefinedVariable

MboValueAdapter – Initial, Previous and Current Value of a Field

The Theory

Sometimes when you work with a Mbo in a MboSet and you change fields in a Mbo it can be useful to get the original value of the field before the change or the last value of the field before the change. So basically a field can have three different values we can ask for:

valudata2

For that purpose we can use the MboValueAdapter and MboValue classes which are automatically initialized with every Mbo retrieved from the system

The CurrentValue of  a field usually can be red by the following Method via a Mbo:

wonum = mbo.getString("WONUM") # wonum is of type string

The same action can also be achived using the MboValueAdapter:

mboValue = mbo.getMboValue("WONUM") # mboValue is of Type mboValue 
currentValue = mboValue.getCurrentValue() # currentValue is of type MaxType
wonum = currentValue.asString() # wonum is of type string

# The previous 3 lines can be merged to a shorter Version:
wonum = mbo.getMboValue("WONUM").getCurrentValue().asString()

Now the short version to get the PreviousValue which can only be get via the MboValueAdapter:

wonum = mbo.getMboValue("WONUM").getPreviousValue().asString()

And the InitialValue which represents the state of the field when the MboSet was initialized:

# Version via Mbo:
wonum = mbo.getDatabaseValue("WONUM")

# Version via ValueAdapter
wonum = mbo.getMboValue("WONUM").getInitialValue().asString()


A practical Example

The scenario I will show you in this blog is based on the Item Mbo and the description field. I will change this field several times and always show you the initial, previous and current value of this field. Precisely we will do the following:

valuedata

As you can see we have 3 point where we verify our output. The following script can be easily created as a new Automation Script without launchpoint. Just take it and try it out! You can run the Script directly from the Automation Script Application.

#AUTOSCRIPT:MBOVALUEADAPTER
#DESCRIPTION:Demo to show usage of mboValueAdapter
#LOGLEVEL:ERROR
from psdi.server import MXServer
from psdi.iface.mic import MicService

# Initialize some stuff
mxServer = MXServer.getMXServer()
micService = MicService(mxServer)
micService.init()
userInfo = micService.getNewUserInfo()

itemSet = mxServer.getMboSet('ITEM', userInfo)
itemMbo = itemSet.moveFirst()
 
# Get Value for Field Description
stringValue = itemMbo.getString("DESCRIPTION")
itemMbo.setValue("DESCRIPTION", stringValue + "_new")

# Get the new Value again
stringValueNew = itemMbo.getString("DESCRIPTION")
itemMbo.setValue("DESCRIPTION", stringValue + "_new_new")

# Get the new Value again
stringValueNewNew = itemMbo.getString("DESCRIPTION")

print "Original Value              = " + stringValue
print "Value after 1. Change       = " + stringValueNew
print "Value after 2. Change       = " + stringValueNewNew


# Now work with the new MboValue Class
mboValue = itemMbo.getMboValue("DESCRIPTION")
initialValueAsString = mboValue.getInitialValue().asString()
previousValueAsString = mboValue.getPreviousValue().asString()
currentValueAsString = mboValue.getCurrentValue().asString()

print "-----------------------------------------------------------------"
print "Now Mbo Value Results"
print "-----------------------------------------------------------------"
print "Initial Value               = " + initialValueAsString
print "Previous Value before 2. change = " + previousValueAsString
print "Current Value from MboValue = " + currentValueAsString

itemSet.save()

print "-----------------------------------------------------------------"
print "Now After itemSet.save()"
print "-----------------------------------------------------------------"

mboValue = itemMbo.getMboValue("DESCRIPTION")
initialValueAsString = mboValue.getInitialValue().asString()
previousValueAsString = mboValue.getPreviousValue().asString()
currentValueAsString = mboValue.getCurrentValue().asString()

print "Initial Value               = " + initialValueAsString
print "Previous Value before 2. change = " + previousValueAsString
print "Current Value from MboValue = " + currentValueAsString

itemSet.reset()
itemSet = mxServer.getMboSet('ITEM', userInfo)
itemMbo = itemSet.moveFirst()

print "-----------------------------------------------------------------"
print "Now After itemSet.reset()"
print "-----------------------------------------------------------------"

mboValue = itemMbo.getMboValue("DESCRIPTION")
initialValueAsString = mboValue.getInitialValue().asString()
previousValueAsString = mboValue.getPreviousValue().asString()
currentValueAsString = mboValue.getCurrentValue().asString()

print "Initial Value               = " + initialValueAsString
print "Previous Value before 2. change = " + previousValueAsString
print "Current Value from MboValue = " + currentValueAsString

The output should look similar to the following:

Original Value              = IT Services
Value after 1. Change       = IT Services_new
Value after 2. Change       = IT Services_new_new
-----------------------------------------------------------------
Now Mbo Value Results
-----------------------------------------------------------------
Initial Value               = IT Services
Previous Value before 2. change = IT Services_new
Current Value from MboValue = IT Services_new_new
-----------------------------------------------------------------
Now After itemSet.save()
-----------------------------------------------------------------
Initial Value               = IT Services
Previous Value before 2. change = IT Services_new
Current Value from MboValue = IT Services_new_new
-----------------------------------------------------------------
Now After itemSet.reset()
-----------------------------------------------------------------
Initial Value               = IT Services_new_new
Previous Value before 2. change = IT Services_new_new
Current Value from MboValue = IT Services_new_new

The UserInfo Object

In this Blog I would like to introduce the often used UserInfo Object in Maximo / ICD Scripting. There are a number of API method calls which require a UserInfo object as a parameter and therefore you need to know how you can get a reference to that object. In the second part of this Blog I will show you some method calls on utilizing the UserInfo yourself.

Get a reference to the UserInfo Object

When you run a Jython script there are several ways to get the UserInfo object.

Get the userInfo for the actual user the script is running in context of a Mbo

userInfo = mbo.getUserInfo()  # @UndefinedVariable

Get the userInfo for a specific user

from psdi.server import MXServer
mxServer = MXServer.getMXServer()
userInfo = mxServer.getUserInfo("maxadmin")

Get the userInfo for the System user (MAXADMIN)

from psdi.server import MXServer
mxServer = MXServer.getMXServer()
userInfo = mxServer.getSystemUserInfo()

Get a new userInfo from Migration Services (MAXINTADM)

from psdi.server import MXServer
from psdi.iface.mic import MicService

mxServer = MXServer.getMXServer()
micService = MicService(mxServer)
micService.init()
userInfo = micService.getNewUserInfo()

Usage of the UserInfo Object

Beside the fact that a lot of method calls of Maximo/ICD API’s require a valid UserInfo object it has a number of interesting Getter and Setter functions which might help in your script. I would like to show you only a small subset of these methods here in this Blog. A full list can be found in the JavaDoc documentation.

Here I have a small demonstration script for you which can be directly run from the Automation Scripts application (look here how to do this):


#AUTOSCRIPT:USERINFO
#DESCRIPTION:Example script showing capabilities of the UserInfo Object

from psdi.server import MXServer

mxServer = MXServer.getMXServer()
userInfo = mxServer.getSystemUserInfo()

print "User Name        : " + str(userInfo.getUserName())
print "User Display Name: " + str(userInfo.getDisplayName())
print "User ID          : " + str(userInfo.getLoginUserName())
print "e-Mail           : " + str(userInfo.getEmail())
print "Default Language : " + str(userInfo.getDefaultLang())
print "Current Language : " + str(userInfo.getLangCode())
print "Timezone         : " + str(userInfo.getTimeZone())

# Check if we are running in Interactive mode or from a System Job
if not userInfo.isInteractive():
    print "------"
    print "Setting Language code to EN"
    print "------"

    userInfo.setLangCode("EN")

    print "Current Language : " + str(userInfo.getLangCode())

The script basically will get the UserInfo Object for the System User and after that will print out a couple of information. To avoid Null Pointers I have convert all outputs to a String value. At the end it will change the current Language for the user to a different value.


User Name        : MAXADMIN
User Display Name: Max Admin
User ID          : MAXADMIN
e-Mail           : None
Default Language : DE
Current Language : DE
Timezone         : sun.util.calendar.ZoneInfo[id="America/New_York",offset=-18000000,dstSavings=3600000,useDaylight=true,transitions=235,lastRule=java.util.SimpleTimeZone[id=America/New_York,offset=-18000000,dstSavings=3600000,useDaylight=true,startYear=0,startMode=3,startMonth=2,startDay=8,startDayOfWeek=1,startTime=7200000,startTimeMode=0,endMode=3,endMonth=10,endDay=1,endDayOfWeek=1,endTime=7200000,endTimeMode=0]]
------
Setting Language code to EN
------
Current Language : EN

Some obstacles in the output:

  1. The Timezone value is not a string, but another object of type sun.util.calendar.ZoneInfo. If you need that information you should access the value with the methods from the ZoneInfo object.
  2. I implemented a condition “userinfo.isInteractive()”. Interactive normally means, that a script runs based on an end user GUI Action, while “not interactive” means that the script runs from an escalation or automatic workflow. If we run the script manually from the Automation Script application the isInteractive() method returns false.

Using Maximo messages in multi-language environments

Your first question could be in this context: “Why should I read translations from the message system? Messages for Message boxes are always displayed in the correct user language!”. This is correct, but let’s assume the case that you would like to fill in a String field in a MBO Record with a text string which should be in the correct language of the user who is using the system. In that case we are not using the message system of Maximo in it’s original form, but more as a translation vehicle which we can ask: “I have a user with German language settings here. Please provide me the the defined translation for message <msggroup> <msgkey>.”. This is cool.

I will show you with a short script how you can display the content of messages in different languages:

#DESCRIPTION:Translate messages in the User-Language
from psdi.server import MXServer

mxServer = MXServer.getMXServer()
userInfo = mxServer.getUserInfo("maxadmin")

def getMessage(group, key):
    return MXServer.getMXServer().getMessage(group, key, userInfo.getLangCode())

userInfo.setLangCode("EN")  
print getMessage("access", "DBConnectFail")
print "--------------------------------------------------------"

userInfo.setLangCode("DE")
print getMessage("access", "DBConnectFail")

The result from running this script directly in the Automation Script Application (see here for details how to run a script) should look as follows:

Selection_045

Quit cool. Instead of printing out the message you could assign it to a variable and do some work on it…

Use a Button to launch an action script

A very common usage of automation scripting is to develop the action logic when a button is pressed in an application. The concept I will describe in this blog is principal the same for the following three scenarios:

  • A button included in the application with the application designer (I will show this in this blog)
  • A Toolbar Menu entry (Icon Toolbar)
  • A Action Menu entry

So what are the steps to create a button and run the script on it?

  • Create a new Signature Option and assign it to the appropriate user group.
  • Create the new Button, Toolbar Menu or Action Menu in Application Designer.
  • Create a new Automation Script with an Action launchpoint.

I would like to take a demo scenario with very simple scripting so we can concentrate mainly on the other stuff. In the Item Master Application when a new item is created the Commodity Group and Commodity Code has to be selected for each item. Let’s say you are mostly entering new Laptop items and you would like to get a “Default Commodity” button to fill in these two fields with default values like this:

Selection_028

That’s basically all, so lets start.

Create a new Signature Option and assign it to the appropriate user group

To create a new Signature Option we need to go the the Application Designer:

  • Go To > System Configuration > Platform Configuration > Application Designer
  • Select the application ITEM (Item Master) in the List View.
  • Now you go the “Select Action” menu and select the “Add/Modify Signature Options” entry.

Menu_030

  • In the dialog which opens hit the “New Row” button to add a new Signature Option.
  • Create a new Option with a name and a comment like follows:

Selection_031

And now the important part!!! Did you recognized the “Advanced Signature Options” section which is closed by default? Open it and check the following point:

Selection_032

If you forget to check this entry your button will never work and your script will never run.

  • Click on OK to close the dialog.
  • Assign the new Signature Option to a Security Group where your user is in (e.G. MAXADMIN for testing). You will find the new signature Option in the ITEM Application section:Selection_033
  • Don’t forget to logoff / logon to the Server before you proceed.

Create the new Button in Application Designer

After a new logon proceed in the Application Designer:


  • Go To > System Configuration > Platform Configuration > Application Designer
  • Select the application ITEM (Item Master) in the List View.
  • In the Application design screen select the “Item” Tab from the application.
    Selection_035
  • Open the Control Palette dialog in the Toolbar: Selection_034
  • From the Control Palette Drag and Drop the “Button Group” symbol to the “Commodity Group” Text. The button group should occur above the Commodity Group.
  • Right Click on the “pushbutton…” and select the properties Menu
  • Enter the following Values:
    • Label: “Default Commodity”
    • Event: “DEFCOMM” (This is the Name of the Action we will define later)
    • Signature Option (on page two): DEFCOMM (the one you created before)
      Selection_036

That is basically all you need to do in Application Designer. Your Button should now look as follows:

Selection_037

Save your work.


Create and test the automation Script

The new script will be created in:

Go To > System Configuration > Plattform Configuration > Automation Scripts

In the Select “Select Action” box select “Create > Script with Action Launchpoint”.

Menu_038

Fill in the dialog as follows and press “Next” when done:

Selection_039

Interesting here is the Object field. This field is the MBO Object your are in and which your script will get as the implicit “mbo” Variable.

In the next dialog we need to fill in some more values. It is always good practise to name the action, launchpoint and script the same (unless you will have multiple launchpoints with different meanings for a script).

Selection_040

Press the “Next” button when filled in.

In the last dialog you will have to paste in the following script code:

itemMbo = mbo  # @UndefinedVariable
itemMbo.setValue("COMMODITYGROUP", "43211500")
itemMbo.setValue("COMMODITY", "43211503")

Press “Create” to create the automation script. The Action object will be automatically created in background. Don’t forget this when you need to transport your development to another system.

Test the new solution

To test your new button:

Go To > Inventory > Item Master

Create a new Item and press the new Button. The Commodity Group and Code should be automatically be filled in. Congratulations!

Selection_041


Download (all) Scripts from Maximo / ICD to your Eclipse Project

In one of my last blogs I showed a very nice way how to upload Jython scripts from Eclipse to your Maximo / ICD environment. Now what about the situation that you already have a Maximo / ICD environment with tons of scripts in it? In this blog I will show you a simple way how you can include all these scripts to your Eclipse project within 15 minutes. This will also include the first comment lines needed for the later upload.

To achieve our goal the following steps are needed:

  • Setup an application export in the Autoscript application
  • Download a XML File including all scripts
  • Run a Jython script to extract all the unique scripts

Setup an application export in the Autoscript application

The application export will be configured using the “Object Structures” application. Launch:

Go To > Integration > Object Structures

In the Object Structures application search for the “MXSCRIPT” Object Structure and open it.

Selection_018

After opening select an action:

Select Action > Add/Modify Application Export Support


Menu_020

In the dialog box create a new row in the table using the values shown here:

Selection_021

Press OK. The export support now has been created. Next step is to grant the security rights to the user group which should use the tool. In my example I will grant the rights to the maxadmin group. Goto the following Menu:

Go To > Security > Security Groups

Now perform the following steps:

  1. Search and open the security group you want to grant the rights to.
  2. Change to the “Applications” Tab.
  3. Filter for the Application “Automation Scripts” and select the record.
  4. In the Options for Automation Scripts section enable the option “Application Export”.Selection_022
  5. Save the Security Group.
  6. Logoff and Logon again to Maximo / ICD. Be sure that all your user sessions are successfully logged of – otherwise the settings will not be activated.

Download a XML File including all scripts

To download a XML File which includes all scripts in your system you have to go to the Automation Scripts application.

Go To > System Configuration > Plattform Configuration > Automation Scripts

If the previous step worked correctly you should now see a new Icon in the iconbar Selection_023for the application export. Before you press this button you have to search for the scripts to export. If all scripts should be exported just press enter in the search field. Now press the icon.

In the “Application Export” Dialog you just can take all settings and press “OK”.

Selection_024

The XML File now will be downloaded to the download directory of your browser on your local PC.

Run a Jython script to extract all the unique scripts

First of all you have to have a project setup in Eclipse where you would like to store your downloaded scripts. This chapter requires a complete project-setup using Eclipse, Jython and PyDev like described in this blog. Copy the downloaded XML file to this directory and name it scripts.xml.

Now create a Jython script with the following code:

#AUTOSCRIPT:EXPORTSCRIPTS
#DESCRIPTION:Script to export all Jython Scripts on a Server
#LOGLEVEL:ERROR

from java.io import File
from org.jdom.input import SAXBuilder

xmlFile = File("scripts.xml")
builder = SAXBuilder()

document = builder.build(xmlFile)
wrap = document.getRootElement()
ns = wrap.getNamespace()
rootNode = wrap.getChild("MXSCRIPTSet", ns)

liste = rootNode.getChildren("AUTOSCRIPT",ns)
for i in range(0,liste.size()):
    node = liste.get(i)
    scriptName = node.getChildText("AUTOSCRIPT",ns)
    scriptDesc = node.getChildText("DESCRIPTION",ns)
    scriptVersion = node.getChildText("VERSION",ns)
    scriptDebug = node.getChildText("LOGLEVEL",ns)
    scriptCode = node.getChildText("SOURCE",ns).encode('utf-8')
    
    scriptFile = open(scriptName + ".py","w")
    scriptFile.write("#AUTOSCRIPT: " + scriptName + "\n")
    scriptFile.write("#DESCRIPTION:" + scriptDesc + "\n")
    scriptFile.write("#VERSION:    " + scriptVersion + "\n")
    scriptFile.write("#LOGLEVEL:   " + scriptDebug + "\n")
    scriptFile.write(scriptCode)
    scriptFile.close()

This scripts requires the Java JDOM Class. Please ensure that the jdom.jar file is included in your PYTHONPATH. You can check this by right-click on your Eclipse project and select the “Properties” Menu. Check under “PyDev – PYTHONPATH” if jdom.jar is existent. If not use the “Add zip/jar/egg” Button to add it.

Selection_025

Remark: If you don’t have a local version of jdom.jar you can find one on your Maximo / ICD Server in the following directory: %WEBSPHERE _DIR%\AppServer\profiles\ctgAppSrv01\installedApps\ctgCell01\MAXIMO.ear\lib

Everything is prepared now. You can run the Script now from Eclipse using the Run Icon Arrow  Selection_009 and then the following menu:

Menu_026

Hopefully after a refresh of your project/folder (F5) you will see a bunch of new scripts! Congratulations!

Deleting Mbo’s

So far we know how to insert, update and view our Mbo records, so the next step is to delete a record.

You delete Mbo’s by calling the delete() method. This method removes the current Mbo from an MboSet. Basically the Mbo is not delete when you call the delete method it is more over marked for deletion. The real delete operation is executed when the transaction is commit to the database. In general this is the save operation on the MboSet.

Here comes an example which deletes a specifc Workorder from the Workorder MboSet:

    # Example: Delete a specific Mbo
    woset = session.getMboSet('WORKORDER')
    woset.setWhere("WONUM = '2009'")
    woset.reset()
    wo = woset.moveFirst()
    
    if wo is not None:   
        # Mark Mbo for deletion
        wo.delete()

        # Real delete is done at this point
        woset.save()

Using field Flags to set attribute content

Each attribute in Maximo / ICD can have several Validation Java classes and Jython scripts associated which will trigger when a new value for an attribute is set. Field flags can control some of the conditions under which the attributes can be modified and prevent execution of that classes / scripts.

The following field Flags are commonly used:

  • NOACCESSCHECK is used to update the value even if the attribute is marked readonly
  • NOVALIDATION supressess checking of the value. Be sure you know what you do, because you will prevent the business logic from checking for a valid value.
  • DELAYVALIDATION does not perform any validation when the attribute is modified. The validation takes place on the save action. This can be useful if the validity of an attribute depends on other attributes.
  • NOACTION is used to bypass the execution of all business rules. Use it carefully!
  • NOVALIDATION_AND_NOACTION is a combination of the NOVALIDATION and NOACTION flag.

Now how do we use these flags in Jython? They are used in the setValue() Method as a third parameter. So sometimes you will see scripts like this:

itemMbo.setValue(description", "Hello World!", 1L)

In this 1L stands for NOVALIDATION and it is bad practise to write it in a numeric format. How about this style?

from psdi.mbo import MboConstants
itemMbo.setValue("description", "Hello World!", MboConstants.NOVALIDATION)
companyMbo.setValue("company", "COM1", MboConstants.NOVALIDATION_AND_NOACTION)

If multiple field flags should be combined for a field they could be combined by a bitwise or operation. See this example:

from psdi.mbo import MboConstants
itemMbo.setValue("description", "Hello World!", MboConstants.NOVALIDATION | MboConstants.NOACCESSCHECK)

So far we always used the setValue method to directly manipulate the field flag while we are setting a value to a field. In some cases it is also useful to just set the field flag without applying a new value. This can be done with the setFieldFlag method. You can set and remove certain flags from a field. Mostly taken is this for the read only state:

from psdi.mbo import MboConstants
itemMbo.setFieldFlag("description", MboConstants.READONLY,False)
itemMbo.setValue("description", "Hello World!")
itemMbo.setFieldFlag("description", MboConstants.READONLY,True)

The setFieldFlag method can also take a list of fields as a parameter, if you would like to modify a bunch of fields:

from psdi.mbo import MboConstants
fields = ['DESCRIPTION','ITEMTYPE', 'ORDERUNIT']
itemMbo.setFieldFlag(fields, MboConstants.READONLY,False)

Upload Jython Scripts from Eclipse to Maximo/ICD

In this post I would like to introduce a cool feature to upload your Jython scripts developed in Eclipse directly to Maximo/ICD without the need to jump to the scripting application and doing some copy/paste actions. To Archive this objective we will utilize the Integration Framework and will write a small Jython script to be called from Eclipse and utilizing this interface. I will show you step by step the different configuration steps.

This is a quit complex configuration to do and there are a lot of places to introduce errors so that the complete system will not work. Please post me your experiences with the configuration as a comment so I can improve this article over time.

Prerequisites

What are the prerequisites for our project:

  1. An Eclipse Installation with PyDev integrated where you develop your Jython Scripts
  2. A local Jython 2.x installation (which should normally already be in place). Please consider that we need a full installation and it is not enough to just have a copy of the jython.jar file since we need some standard Jython libraries for our project.
  3. Access to a Maximo/ICD System

The solution currently only has been tested with local authorization. The Upload script might need slight modifications for LDAP authorization (comments welcome :-).

The solution currently only supports http protocol. If you are using https the upload script might need some modifications.

Preparations Integration Framework in Maximo/ICD

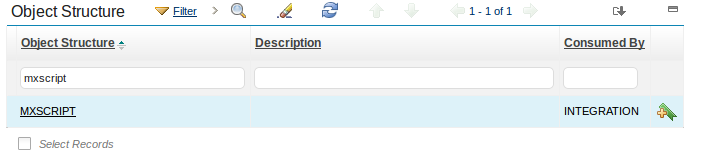
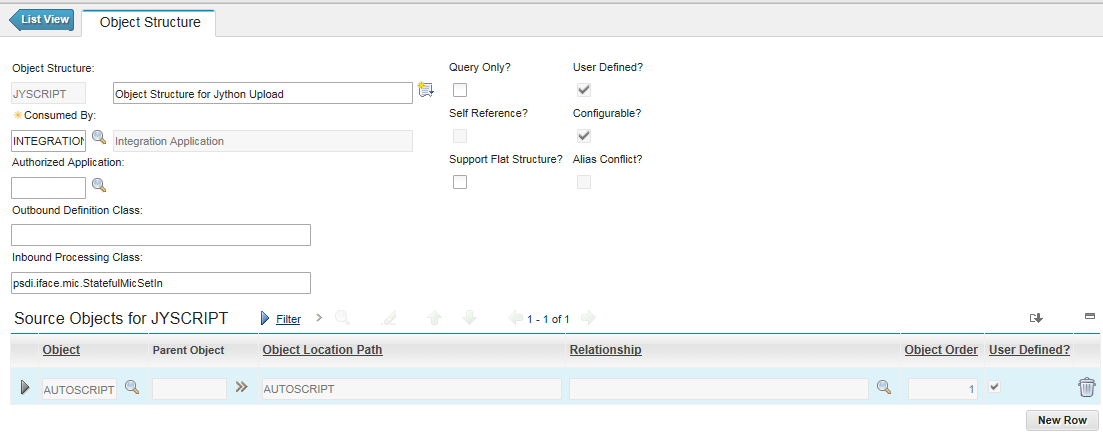
Create a new Object Structure

We need to create an own Object Structure based on the existing MXScript Structure.

  1. Go to menu Integration → Object Structure and search the MXScript Object Structure.
  2. Duplicate the Object Structure (Select Action → Duplicate Object Structure)
    jythoneclupl1
  3. The new Object Structure should be called JYSCRIPT unless you want to edit the upload script later on.
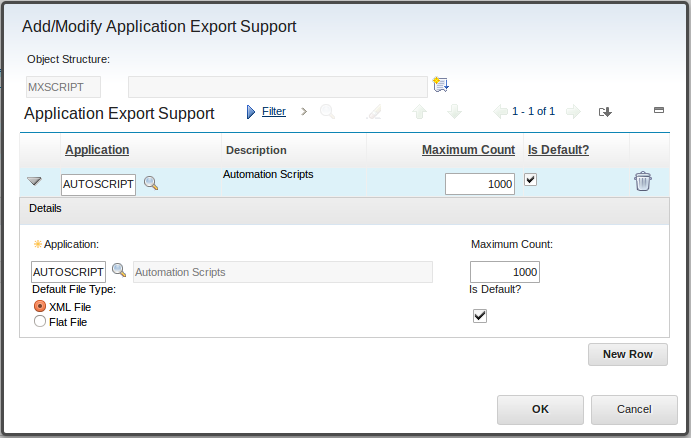
  4. Remove the Source Object „AUTOSCRIPT/VARSThe configuration for the duplicated Object Structure should now look like this:jyecli02
  5. Select Action → Exclude/Include Fields
    Exclude all fields except the following ones:
    • AUTOSCRIPT
    • DESCRIPTION
    • LOGLEVEL
    • SCRIPTLANGUAGE
    • SOURCE
    • VERSION

Create an Enterprise Service

A new Enterprise Service must be created.

  1. Go to menu Integration → Enterprise Services
  2. Create a new Record and fill in the following fields only:
    jyecli03
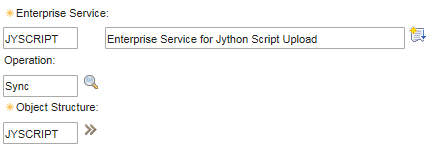
  3. Save the Enterprise Services

Create an External System

A new External System must be created by the following steps:

  1. Go to menu Integration → External Systems
  2. Create a new Record and fill in the System Tab with the following values:
    jyecli04
  3. Be sure all fields are filled in as shown
  4. Select the tab “Enterprise Services” and create a connection to the previously created Enterprise service. For this select the “New Row” button. Fill in the new line as follows:
    jyecli05
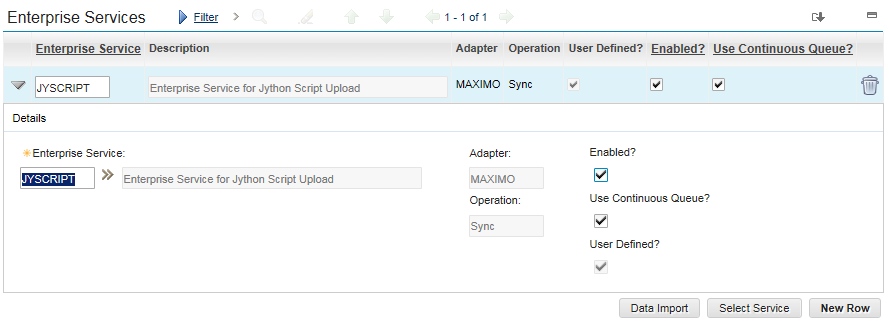
  5. Be sure that the enabled box is checked.
  6. Save the External System. The configuration on the Maximo/ICD side is now finished.

 Configuration of the Eclipse Side

The configuration of Eclipse consist of two steps:

  • Prepare Upload Script
  • Create a “Run entry” in the Run configuration.

Prepare Upload Script

Take the following script and store it in a place of a Eclipse project. The project should have a valid Jython Runtime configured. Please have a look to this article for proper Eclipse setup if you are unsure.

#-------------------------------------------------------------
# AUTOSCRIPT:         UPLOADSCRIPT
# DESCRIPTION:        Script to upload Jython Scripts from
#                     Eclipse to Maximo / ICD
# AUTHOR:             Matthias Stroske
# Created             25.11.15
# VERSION:            1.0
# COPYRIGHT:          (c) Matthias Stroske
# MAXIMO/ICD Version: 7.5 and higher
#-------------------------------------------------------------
# History of Changes
#
# Ver  Date      Name               Description
# 1.0  01.10.15  Matthias Stroske   Initial Version
# 1.1  25.11.15  Matthias Stroske   Improved Parameter Handling
#
#-------------------------------------------------------------
 
import sys
import httplib
import base64
import string
import re
from xml.sax.saxutils import escape
 
def main():
    if len(sys.argv) < 5:
        print "USAGE: UploadScript.py <inDatei> <host> <user> <password>"
        sys.exit()
 
    inDatei = sys.argv[1]
    host = sys.argv[2]
    user = sys.argv[3]
    password = sys.argv[4]
     
    # Set Defaults as far as possible
    scriptName = None
    scriptDescription = None
    logLevel = "ERROR"
    version = "1.0"
 
    httpUrl = "http://" + host + "/meaweb/es/JYSCRIPT/JYSCRIPT"
 
    try:
        f = open(inDatei)
        fileContent = f.read()
    except Exception,ex:
        print ("Error reading the input file!")
        print ("Exception:" + str(ex))
    else:
        f.close
 
    firstLines = fileContent.split("\n", 15)
    for line in firstLines:
        matchObj = re.match(r'^#\s*DESCRIPTION:(.*)',line, re.I)
        if matchObj:
            scriptDescription = matchObj.group(1)
        matchObj = re.match(r'^#\s*AUTOSCRIPT:(.*)', line, re.I)
        if matchObj:
            scriptName = matchObj.group(1)
        matchObj = re.match(r'^#\s*LOGLEVEL:(.*)', line, re.I)
        if matchObj:
            logLevel = matchObj.group(1)
        # Simple Style
        matchObj = re.match(r'^#\s*VERSION:(.*)', line, re.I)
        if matchObj:
            version = matchObj.group(1)
        # CVS Style
        matchObj = re.match(r'^#\s*Revision:(.*)', line, re.I)
        if matchObj:
            version = matchObj.group(1)
             
 
    if scriptName is None or scriptDescription is None:
        print "ScriptName and ScriptDescription have to be specified in first Script Lines!"
        sys.exit()
 
    print "Script Name       = " + scriptName.strip()
    print "DESCRIPTION       = " + scriptDescription.strip()
    print "LOGLEVEL          = " + logLevel.strip()
    print "VERSION           = " + version.strip()
          
    message = "<?xml version=\"1.0\" encoding=\"UTF-8\"?>\n"
    message += "<SyncJYSCRIPT xmlns=\"http://www.ibm.com/maximo\" xmlns:xsi=\"http://www.w3.org/2001/XMLSchema-instance\">\n"
    message += "<JYSCRIPTSet>\n"
    message += "<AUTOSCRIPT>\n"
    message += "<AUTOSCRIPT>" + scriptName.strip() + "</AUTOSCRIPT>\n"
    message += "<DESCRIPTION>" + scriptDescription.strip() + "</DESCRIPTION>\n"
    message += "<LOGLEVEL>" + logLevel.strip() + "</LOGLEVEL>\n"
    message += "<SCRIPTLANGUAGE>jython</SCRIPTLANGUAGE>\n"
    message += "<VERSION>" + version.strip() + "</VERSION>\n"
    message += "<SOURCE>\n"
    message += escape(fileContent)
    #message += "pass\n"
    message += "</SOURCE>\n"
    message += "</AUTOSCRIPT>\n"
    message += "</JYSCRIPTSet>\n"
    message += "</SyncJYSCRIPT>\n"
    message += "\n"
 
    contentType = "application/soap+xml;charset=UTF-8;action=\"urn:processDocument\""
    auth = 'Basic ' + string.strip(base64.encodestring( user + ':' + password))
     
    webservice = httplib.HTTPConnection(host)
    #webservice.set_debuglevel(5) 
    headers = {"Content-type": contentType, "Content-Length": len(message), "Authorization": auth}
    webservice.request("POST", httpUrl, message, headers)
             
    # get the response
    res = webservice.getresponse()
     
    if res.status == 200:
        print "Script upload successful!"
    else:
        print "Script upload completed with RC = " + str(res.status)
     
    webservice.close()
    return
      
if __name__ == "__main__":
    main()

Eclipse External Tools configuration

To run the script in context of Eclipse you need to do an additional configuration step in Eclipse.

Find the following Icon in the Eclipse iconbar:   Selection_004

Select the little arrow beside the icon to expand the menu and select “External Tools Configurations…”

Menu_016

In the following Window fill in the Head section with the Name of the configuration.

Continue to fill in the  Main tab with the following values:

  • Location: The location of your locally installed Jython interpreter.
  • Working Directory: should be ${workspace_loc:/<ProjectName}
  • Arguments: 5 Arguments for the Jython interpreter to run.
    1. Name of Jython Upload Script: e.G. ${workspace_log:/Blog/UloadScript.py}
    2. Name of the Script to be uploaded: Best we can specify here is always: ${workspace_loc}${selected_resource_path}
    3. Maximo / ICD Host: IP Adress or Hostname of the Maximo Server
    4. Username in Maximo / ICD
    5. Password in Maximo / ICD  *** yes I know it is not good to store the PW in clear-text. With little modifications you could store it base64 encoded here if you modify the Jython script slightly.

Selection_017

Preparing your script and using the new tool

Preparing your script

To use the new tool your script must follow a little convention. The first 15 lines must include relevant information which are required to synchronize the script with Maximo/ICD.

#AUTOSCRIPT: UPLOADSCRIPT
#DESCRIPTION: PYTHON UPLOAD SCRIPT 2
#LOGLEVEL: ERROR
#VERSION: 1.0

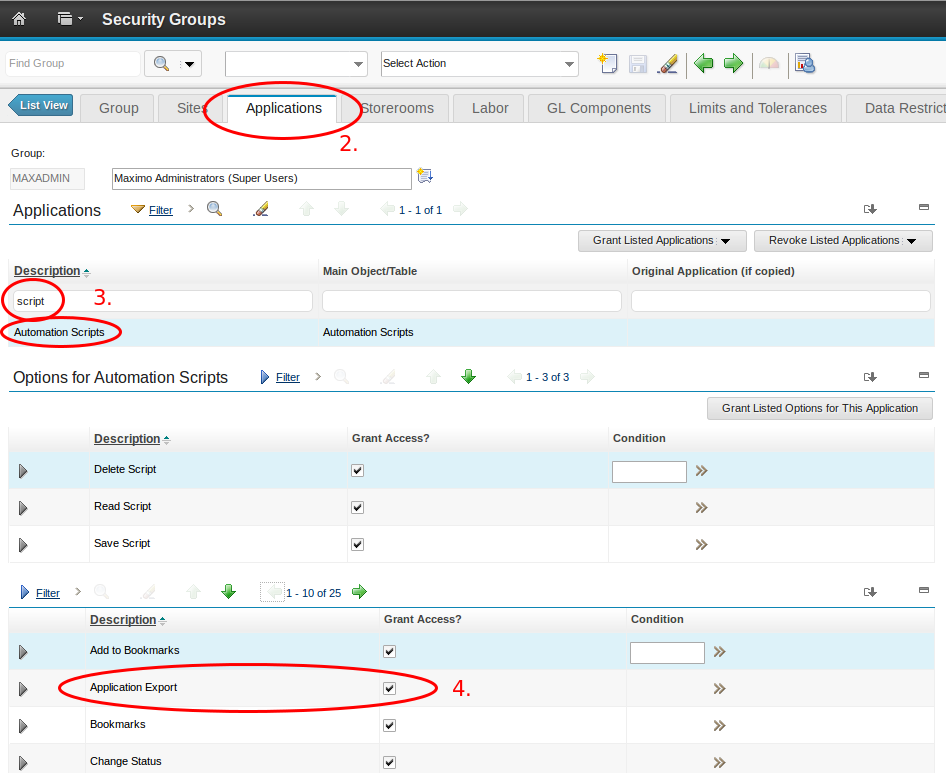
This are fields which map to the appropriate fields in Maximo/ICD. The AUTOSCRIPT field is the Name of the Autoscript in Maximo/ICD. With the upload you can create new automation scripts, but you can not create or modify any launchpoints. When you change the DESCRIPTION,VERSION or LOGLEVEL field later on these fields are modified in Maximo/ICD.

I have created a base template for your code, which can be found in this blog.

Using the new Tool

To use the tool we assume, that you are now editing your custom Maximo/ICD Jython script with the information lines included and some Jython Code. From this place you just need to run the Upload Script by Clicking the Run external Symbol in the iconbar again. Selection_004 A script with the name you have chosen during configuration should appear in the drop down list.

After some second you will hopefully get a response “Script upload successful”  in the Console View of Eclipse. Otherwise you’ll get an error with the http Return Code.

Selection_046

I hope the solution will work in your environment!

1 2 3